Blog Credits
Blog Layout Designed And Installed By CreativeCrazyScraps The Scrapkit Used Is Called A Fairy Garden.By Gothic Inspirations
The Image Used In the Header Is The Art Of Rossana Castellino.
The Image Used In the Header Is The Art Of Rossana Castellino.
Archive
-
▼
2013
(61)
- November (1)
- October (5)
- September (5)
- August (1)
- July (2)
- June (5)
- May (8)
- April (7)
- March (11)
- February (13)
- January (3)
-
►
2012
(95)
- December (5)
- November (2)
- October (12)
- September (9)
- August (14)
- July (5)
- June (5)
- May (7)
- April (5)
- March (9)
- February (11)
- January (11)
-
►
2011
(63)
- December (13)
- November (6)
- September (1)
- August (2)
- July (3)
- June (8)
- May (10)
- April (4)
- March (9)
- February (6)
- January (1)
-
►
2010
(106)
- December (4)
- November (7)
- October (13)
- September (4)
- August (5)
- July (9)
- June (10)
- May (21)
- April (6)
- March (8)
- February (13)
- January (6)
Categories
- AWARDS (11)
- BLOGTRAINS (38)
- CBJ (6)
- CDO (2)
- CHIT CHAT (10)
- COMMERCIAL USE (8)
- CT TAG (22)
- CT TUTORIAL (65)
- CT/ A TaggersScrap (5)
- CT/AMY MARIE (3)
- CT/ANNA (1)
- CT/BETH (2)
- CT/GOTHICINSPIRATIONS (2)
- CT/SoxationalScraps (2)
- FREEBIES (32)
- HOME (7)
- MUSIC (2)
- MY TUTORIALS (131)
- p (1)
- PFD (1)
- PSP SCRIPT (2)
- PTU (24)
- PTU SCRAPKITS (10)
- PU ONLY (6)
- RAC CT (1)
- TAGS (18)
- TEMPLATES (3)
Blog Archive
- November ( 1 )
- October ( 5 )
- September ( 5 )
- August ( 1 )
- July ( 2 )
- June ( 5 )
- May ( 8 )
- April ( 7 )
- March ( 11 )
- February ( 13 )
- January ( 3 )
- December ( 5 )
- November ( 2 )
- October ( 12 )
- September ( 9 )
- August ( 14 )
- July ( 5 )
- June ( 5 )
- May ( 7 )
- April ( 5 )
- March ( 9 )
- February ( 11 )
- January ( 11 )
- December ( 13 )
- November ( 6 )
- September ( 1 )
- August ( 2 )
- July ( 3 )
- June ( 8 )
- May ( 10 )
- April ( 4 )
- March ( 9 )
- February ( 6 )
- January ( 1 )
- December ( 4 )
- November ( 7 )
- October ( 13 )
- September ( 4 )
- August ( 5 )
- July ( 9 )
- June ( 10 )
- May ( 21 )
- April ( 6 )
- March ( 8 )
- February ( 13 )
- January ( 6 )
- December ( 2 )
- November ( 1 )
- October ( 1 )
- September ( 2 )
- August ( 1 )
- July ( 2 )
- June ( 6 )
- May ( 2 )
- April ( 2 )
- January ( 2 )
- October ( 17 )
- September ( 4 )
- August ( 4 )
- July ( 3 )
- June ( 5 )
- May ( 1 )
Monday, April 8, 2013

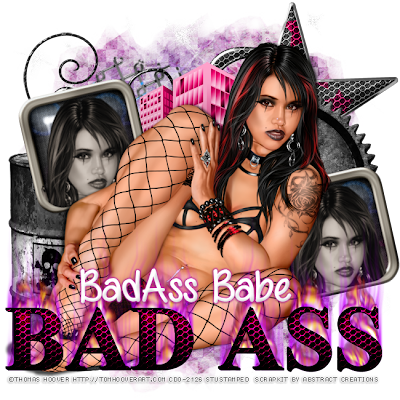
BADASS BABE
This Tutorial Was Written By Stu On 8th April 2013. All My Tutorials Are My Own Creations.Please Dont Claim As Yours.
Supplies
A Copy of paintshop pro i used version X2 but any version will work.
PTU TUBE- Thomas Hoover
I Am using A PTU Bonus Tube By Thomas Hoover. If You Use This Tube
you must do so with the correct license. You Can Find Thomas Art At CDO
PTU SCRAPKIT-Abstract Creations Called BAMF
I Am Using The Great Kit Called BAMF by Abstract Creations You Can purchase From CDO
PSP MASK-Mask 218 By Chelle
-The Mask i Used Is Mask 218 By Chelle from WEESCOTSLASS CREATIONS
FTU FONT-All Things Pink
The FTU Personal Use Font All Things Pink You Can get From DAFONT
PLUGINS-Eye Candy Gradient Glow,Lokas Drop Shadow
-Plugin Used Is Eye Candy 4000 Gradient Glow-Name
lokas Drop shadow on tube.
Lets Begin
Open a new image 650 X 650,Copy and paste a paper of choice as a new layer.
Open your mask in psp and minimise. Layers>New Mask layer From Image>
Find Your Mask>Source Luminance Checked>Invert Data Unchecked>Apply>
Merge Group>Resize As Needed.
Copy And paste the wire as a new layer. Resize as needed.With your raster
deform tool Rotate a little to your liking.see my tag for reference.
Copy and paste the sparkles as a new layer .Adjust>Add Noise>uniform>40>
monochrome>Apply
Copy and paste the doodle as a new layer resize and place to the top left of your mask.
Copy and Paste some elements of choice around the tag to your liking. I used a star
,resize if needed and place to the top right, i used the toxic drum and placed to the bottom
left.I used the gears And placed just below the star.I copied and paste the building as a new
layer and erased some that overhung the image.Copy and paste the glassed square
as a new image resize.as needed.With your selections tool set point to point i drew around the square.
Then copy and paste your tube or image as a new layer.Selections>Invert>delete>
Select None.On the tube layer Go To effects>Photo Effects>Sepia Toning>Set To 23>
Merge Your Tube Down Onto Your Square>Raster Deform
Tool Rotate a little to the right>Duplicate>Place one to the Top Left>
One to the Bottom Right>See Mine For Placement.
Copy and Paste Your main tube.Effects lokas 3d drop shadow,with these setting
below or you can choose one to your own liking
Copy and Paste the wordart , Resize as needed. With a font of choice
write out your name,i used an inner bevel thats your choice.add gradient glow width 3
Crop resize, Add your Copyright Information,
Save As PNG.
Thanks For Looking At My Tutorial
Subscribe to:
Post Comments
(Atom)
TERMS
My Terms Are Simple. Do Not Claim Anything Of Mine As Your Own. Do Not Share Anything From This Blog. Always Send People To My Blog For Download. If You Are A Tutorial Writer And Use Any Of My Stuff Make Sure You Give Credit
Labels
- AWARDS ( 11 )
- BLOGTRAINS ( 38 )
- CBJ ( 6 )
- CDO ( 2 )
- CHIT CHAT ( 10 )
- COMMERCIAL USE ( 8 )
- CT TAG ( 22 )
- CT TUTORIAL ( 65 )
- CT/ A TaggersScrap ( 5 )
- CT/AMY MARIE ( 3 )
- CT/ANNA ( 1 )
- CT/BETH ( 2 )
- CT/GOTHICINSPIRATIONS ( 2 )
- CT/SoxationalScraps ( 2 )
- FREEBIES ( 32 )
- HOME ( 7 )
- MUSIC ( 2 )
- MY TUTORIALS ( 131 )
- p ( 1 )
- PFD ( 1 )
- PSP SCRIPT ( 2 )
- PTU ( 24 )
- PTU SCRAPKITS ( 10 )
- PU ONLY ( 6 )
- RAC CT ( 1 )
- TAGS ( 18 )
- TEMPLATES ( 3 )


0 comments:
Post a Comment